SpringCloudAlibaba

最流行的微服务框架

简介

SpringCloud-Alibaba功能

Nacos服务注册与配置中心

Nacos = Eureka + Config + Bus

下载安装

下载**nacos1.2.1版本**

centos启动

1
2
# 进入 bin目录
sh startup.sh -m standalone

访问

1
2
# 默认用户名和密码是nacos
http://192.168.0.23:8848/nacos/

注册服务

nacos自带负载均衡,整合了Ribbon

父工程pom

1
2
3
4
5
6
7
8
9
10
11
<dependencyManagement>
<dependencies>
<dependency>
<groupId>com.alibaba.cloud</groupId>
<artifactId>spring-cloud-alibaba-dependencies</artifactId>
<version>2.1.0.RELEASE</version>
<type>pom</type>
<scope>import</scope>
</dependency>
</dependencies>
</dependencyManagement>

子工程pom

1
2
3
4
5
6
7
8
<dependency>
<groupId>com.alibaba.cloud</groupId>
<artifactId>spring-cloud-starter-alibaba-nacos-discovery</artifactId>
</dependency>
<dependency>
<groupId>org.springframework.boot</groupId>
<artifactId>spring-boot-starter-actuator</artifactId>
</dependency>

yml

1
2
3
4
5
6
7
8
9
10
11
12
13
14
15
16
server:
port: 9001

spring:
application:
name: nacos-payment-provider
cloud:
nacos:
discovery:
server-addr: 192.168.0.23:8848 #配置Nacos地址

management:
endpoints:
web:
exposure:
include: '*'

启动类

1
2
3
4
5
6
7
@SpringBootApplication
@EnableDiscoveryClient
public class PaymentMain9001 {
public static void main(String[] args) {
SpringApplication.run(PaymentMain9001.class,args);
}
}

nacos切换AP和CP

nacos切换AP和CP

配置中心

nacos的yml配置文件

pom

1
2
3
4
5
6
7
8
9
10
<!--nacos-config-->
<dependency>
<groupId>com.alibaba.cloud</groupId>
<artifactId>spring-cloud-starter-alibaba-nacos-config</artifactId>
</dependency>
<!--nacos-discovery-->
<dependency>
<groupId>com.alibaba.cloud</groupId>
<artifactId>spring-cloud-starter-alibaba-nacos-discovery</artifactId>
</dependency>

boostrap.yml

1
2
3
4
5
6
7
8
9
10
11
12
13
14
15
16
17
18
19
20
21
22
23
24
25
26
27
28
server:
port: 3377

spring:
application:
name: nacos-config-client
cloud:
nacos:
discovery:
server-addr: localhost:8848 #服务注册中心地址
config:
server-addr: localhost:8848 #配置中心地址
file-extension: yaml #指定yaml格式的配置
group: TEST_GROUP #默认:DEFAULT_GROUP
namespace: 00ab1957-eb3f-4555-96ca-3d20817e854d #命名空间id 默认:public
# 读取多个配置文件
ext-config:
- data-id: test.yml
group: dev
# 是否动态刷新
refresh: true
- data-id: test2.yml
group: dev
refresh: true

# 读取格式
# ${spring.application.name}-${spring.profile.active}.${spring.cloud.nacos.config.file-extension}
# nacos-config-client-dev.yaml

application.yml

1
2
3
spring:
profiles:
active: dev

启动类

1
2
3
4
5
6
7
@EnableDiscoveryClient
@SpringBootApplication
public class NacosConfigClientMain3377{
public static void main(String[] args) {
SpringApplication.run(NacosConfigClientMain3377.class, args);
}
}

业务类

1
2
3
4
5
6
7
8
9
10
11
12
@RestController
//支持nacos的动态刷新
@RefreshScope
public class ConfigClientController{
@Value("${config.info}")
private String configInfo;

@GetMapping("/config/info")
public String getConfigInfo() {
return configInfo;
}
}

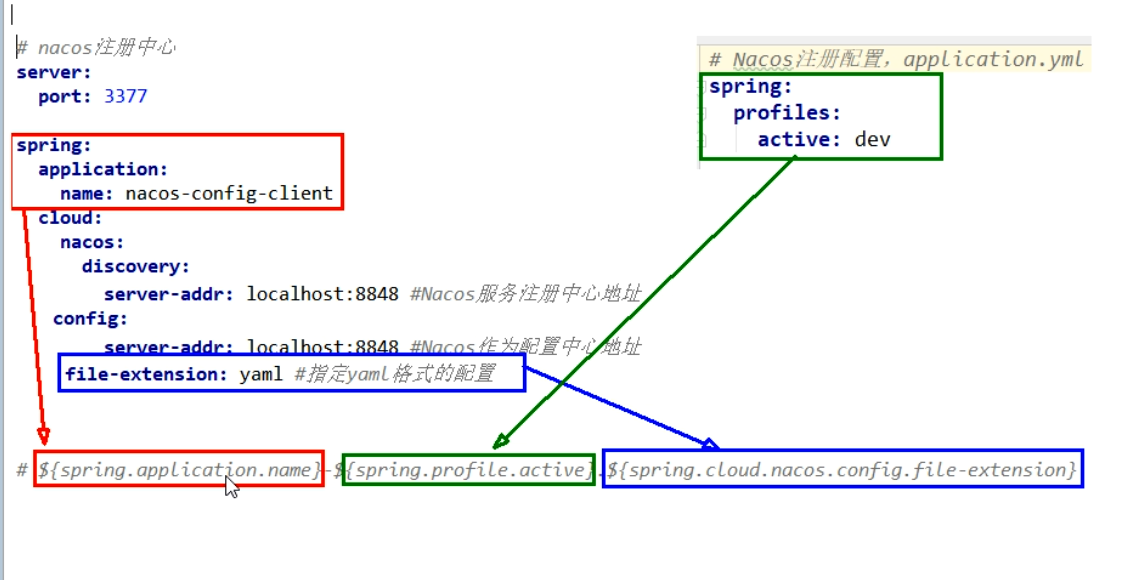
配置Id规则

prefix默认为spring.application.name的值

spring.profile.active既为当前环境对应的profile,可以通过配置项spring.profile.active

file-exetension为配置内容的数据格式,可以通过配置项spring.cloud.nacos.config.file-extension配置

1
${spring.application.name}-${spring.profile.active}.${spring.cloud.nacos.config.file-extension}

nacos配置解析

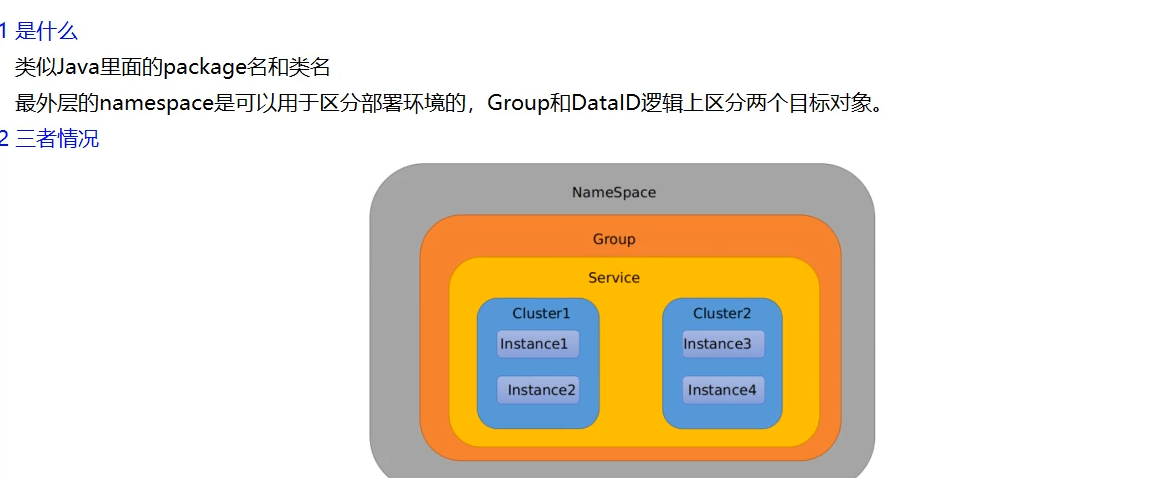
分类配置

config分组简介

DataID方案

指定spring.profile.active和配置文件的DataID来使不同环境下读取不同的配置

nacos-config-DataId配置

Group方案

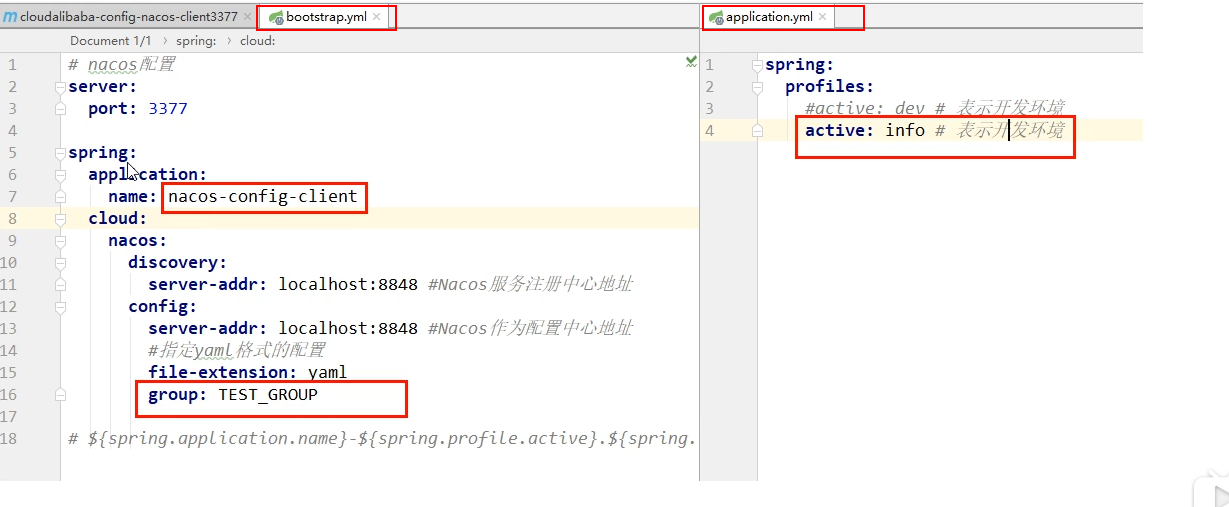
Group-config分组配置

yml中添加Group组配置

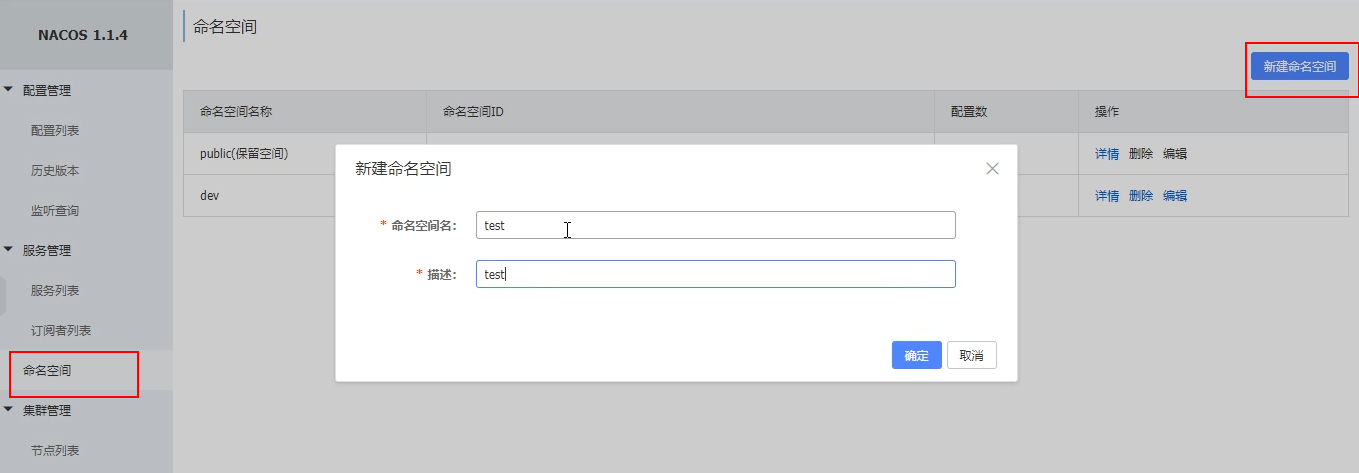
NameSpace方案

config-namspace新建命名空间

config-namespace配置yml

Nacos集群

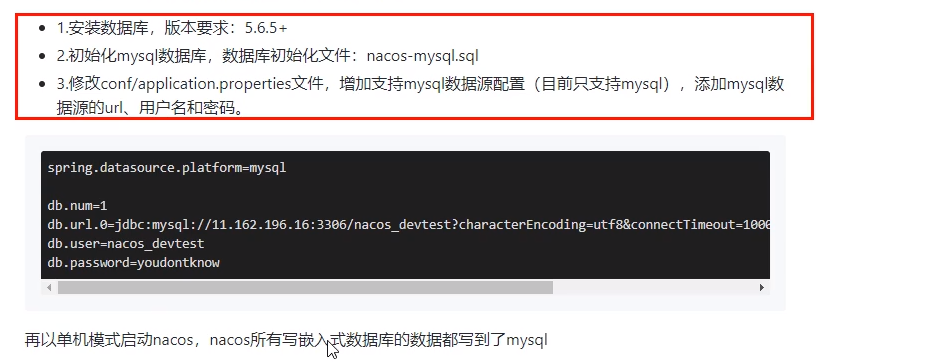
切换到Mysql数据库

nacos默认自带的是嵌入式数据库derby
Nacos数据存储1
Nacos数据存储2

切换数据源
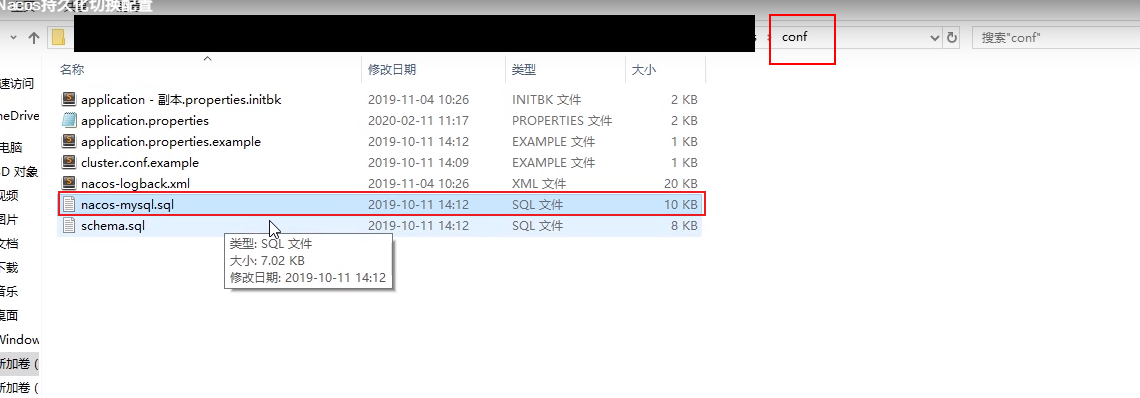
nacos切换数据库执行脚本
nacos修改application文件

application文件添加以下内容

1
2
3
4
5
6
spring.datasource.platform=mysql

db.num=1
db.url.0=jdbc:mysql://localhost:3306/nacos_config?characterEncoding=utf8&connectTimeout=1000&socketTimeout=3000&autoReconnect=true
db.user=数据库用户名
db.password=数据库密码

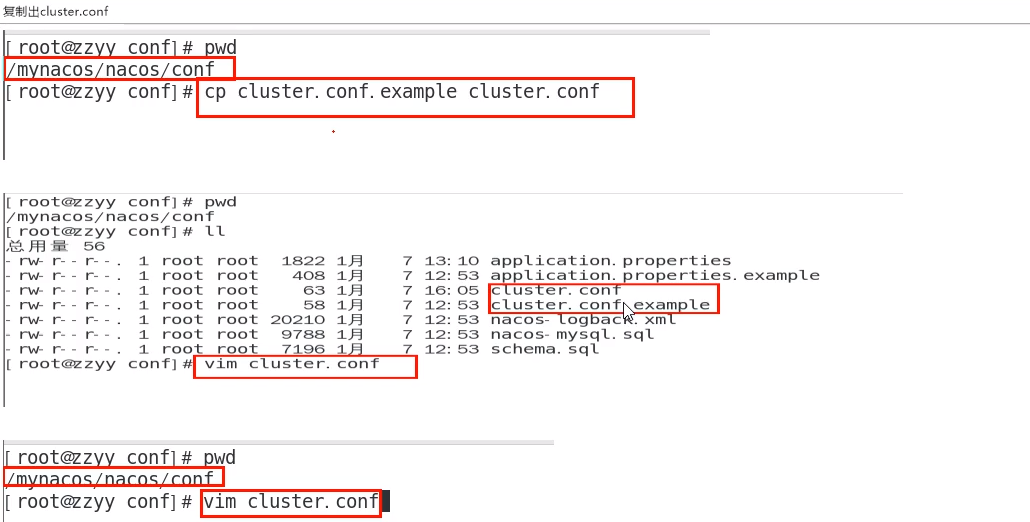
配置cluster文件

nacos集群配置文件cluster
nacos集群配置文件cluster内容

修改startup.sh脚本

nacos修改startup脚本
nacos修改startup脚本2

使用新命令启动

1
2
3
./startup.sh -p 3333
./startup.sh -p 4444
./startup.sh -p 5555

配置Nginx

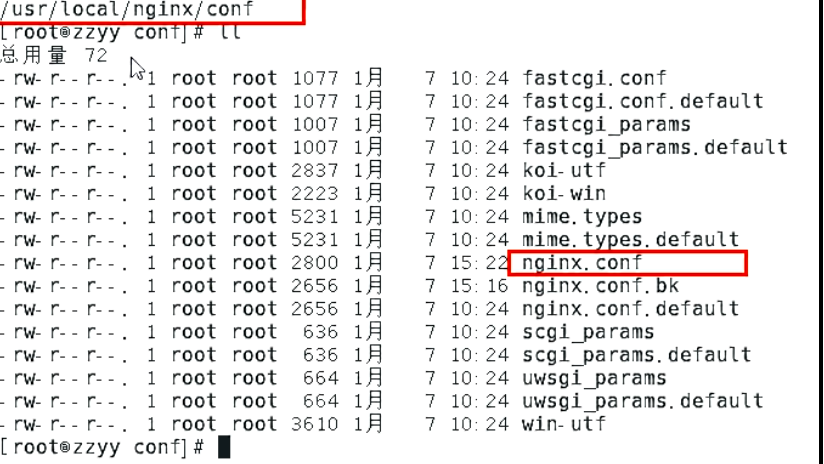
nacos集群修改nginx配置.png

添加配置

1
2
3
4
5
6
7
8
9
10
11
12
upstream cluster{                                                        
server 127.0.0.1:3333;
server 127.0.0.1:4444;
server 127.0.0.1:5555;
}
server{
listen 1111;
server_name localhost;
location /{
proxy_pass http://cluster;
}
}

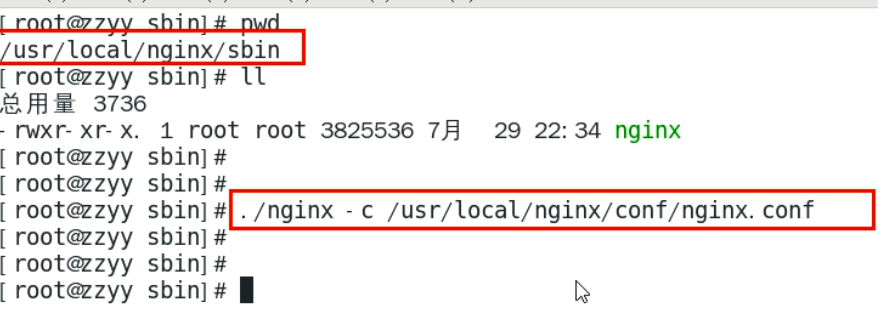
nacos集群nginx启动

通过nginx访问nacos集群

1
https://写你自己虚拟机的ip:1111/nacos/#/login

配置服务进集群

1
server-addr:  写你自己的虚拟机ip:1111

Seata分布式事务

简介

  • XID
    全局事务唯一ID

  • TC - 事务协调者
    维护全局和分支事务的状态,驱动全局事务提交或回滚。

  • TM - 事务管理器
    定义全局事务的范围:开始全局事务、提交或回滚全局事务。

  • RM - 资源管理器
    管理分支事务处理的资源,与TC交谈以注册分支事务和报告分支事务的状态,并驱动分支事务提交或回滚。

处理流程

  1. TM向TC申请开启一个全局事务,全局事务创建成功并创建生成一个全局唯一的XID
  2. XID在微服务调用链路的上下文中传播
  3. RM向TC注册支事务,将其纳入XID对应全局事务的管辖
  4. TM向TC发起针对XID的全局提交或回滚决议
  5. TC调度XID下管辖的全部分支事务完成提交或回滚请求

seata处理流程

使用

Github下载

修改file.conf文件

修改file.conf文件

修改registry文件

修改registry.conf文件

添加数据库seata,运行sql脚本

1
2
3
4
5
6
7
8
9
10
11
12
13
14
15
16
17
18
19
20
21
22
23
24
25
26
27
28
29
30
31
32
33
34
35
36
37
38
39
40
41
42
43
44
45
46
47
48
49
50
51
drop table if exists `global_table`;
create table `global_table` (
`xid` varchar(128) not null,
`transaction_id` bigint,
`status` tinyint not null,
`application_id` varchar(32),
`transaction_service_group` varchar(32),
`transaction_name` varchar(128),
`timeout` int,
`begin_time` bigint,
`application_data` varchar(2000),
`gmt_create` datetime,
`gmt_modified` datetime,
primary key (`xid`),
key `idx_gmt_modified_status` (`gmt_modified`, `status`),
key `idx_transaction_id` (`transaction_id`)
);

-- the table to store BranchSession data
drop table if exists `branch_table`;
create table `branch_table` (
`branch_id` bigint not null,
`xid` varchar(128) not null,
`transaction_id` bigint ,
`resource_group_id` varchar(32),
`resource_id` varchar(256) ,
`lock_key` varchar(128) ,
`branch_type` varchar(8) ,
`status` tinyint,
`client_id` varchar(64),
`application_data` varchar(2000),
`gmt_create` datetime,
`gmt_modified` datetime,
primary key (`branch_id`),
key `idx_xid` (`xid`)
);

-- the table to store lock data
drop table if exists `lock_table`;
create table `lock_table` (
`row_key` varchar(128) not null,
`xid` varchar(96),
`transaction_id` long ,
`branch_id` long,
`resource_id` varchar(256) ,
`table_name` varchar(32) ,
`pk` varchar(36) ,
`gmt_create` datetime ,
`gmt_modified` datetime,
primary key(`row_key`)
);

在需要使用seata的数据库中增加undo.log表

1
2
3
4
5
6
7
8
9
10
11
12
13
CREATE TABLE `undo_log` (
`id` bigint(20) NOT NULL AUTO_INCREMENT,
`branch_id` bigint(20) NOT NULL,
`xid` varchar(100) NOT NULL,
`context` varchar(128) NOT NULL,
`rollback_info` longblob NOT NULL,
`log_status` int(11) NOT NULL,
`log_created` datetime NOT NULL,
`log_modified` datetime NOT NULL,
`ext` varchar(100) DEFAULT NULL,
PRIMARY KEY (`id`),
UNIQUE KEY `ux_undo_log` (`xid`,`branch_id`)
) ENGINE=InnoDB AUTO_INCREMENT=1 DEFAULT CHARSET=utf8;

java的pom中引入

1
2
3
4
5
6
7
8
9
10
11
12
13
14
15
16
17
<dependency>
<groupId>com.alibaba.cloud</groupId>
<artifactId>spring-cloud-starter-alibaba-seata</artifactId>
<!-- 这里排除默认版本 -->
<exclusions>
<exclusion>
<artifactId>seata-all</artifactId>
<groupId>io.seata</groupId>
</exclusion>
</exclusions>
</dependency>
<!-- 引入自己下载的版本 -->
<dependency>
<groupId>io.seata</groupId>
<artifactId>seata-all</artifactId>
<version>1.0.0</version>
</dependency>

yml文件配置

1
2
3
4
5
6
7
spring:
application:
name: qiannong-payment-10003
cloud:
alibaba:
seata:
tx-service-group: file.conf中自定义的名字 # 这里的名字就是在file中自定义的名字

添加file.conf和register.conf配置文件到resource中

1
2
3
4
5
6
7
8
9
10
11
12
13
14
15
16
17
18
19
20
21
22
23
24
25
26
27
28
29
30
31
32
33
34
35
36
37
38
39
40
41
42
43
44
45
46
47
48
49
50
51
52
53
54
55
56
57
58
59
60
61
62
63
64
65
66
67
68
69
70
71
72
73
74
75
76
77
78
79
80
81
82
83
84
85
86
87
88
89
90
91
92
93
94
95
96
97
98
99
100
101
102
103
104
105
106
107
108
109
110
111
112
113
114
115
116
117
118
119
120
# file.conf

transport {
# tcp udt unix-domain-socket
type = "TCP"
#NIO NATIVE
server = "NIO"
#enable heartbeat
heartbeat = true
#thread factory for netty
thread-factory {
boss-thread-prefix = "NettyBoss"
worker-thread-prefix = "NettyServerNIOWorker"
server-executor-thread-prefix = "NettyServerBizHandler"
share-boss-worker = false
client-selector-thread-prefix = "NettyClientSelector"
client-selector-thread-size = 1
client-worker-thread-prefix = "NettyClientWorkerThread"
# netty boss thread size,will not be used for UDT
boss-thread-size = 1
#auto default pin or 8
worker-thread-size = 8
}
shutdown {
# when destroy server, wait seconds
wait = 3
}
serialization = "seata"
compressor = "none"
}

service {
# 这里的.后面是在file.conf中定义的名字
vgroup_mapping.yunle = "default"
# 指定ip地址
default.grouplist = "192.168.0.18:8091"
enableDegrade = false
disable = false
max.commit.retry.timeout = "-1"
max.rollback.retry.timeout = "-1"
disableGlobalTransaction = false
}


client {
async.commit.buffer.limit = 10000
lock {
retry.internal = 10
retry.times = 30
}
report.retry.count = 5
tm.commit.retry.count = 1
tm.rollback.retry.count = 1
}

store {
# 修改成db
mode = "db"

file {
dir = "sessionStore"

max-branch-session-size = 16384
max-global-session-size = 512
file-write-buffer-cache-size = 16384
session.reload.read_size = 100
flush-disk-mode = async
}

db {
datasource = "dbcp"
db-type = "mysql"
driver-class-name = "com.mysql.jdbc.Driver"
url = "jdbc:mysql://127.0.0.1:3307/seata"
user = "root"
password = "root"
min-conn = 1
max-conn = 3
global.table = "global_table"
branch.table = "branch_table"
lock-table = "lock_table"
query-limit = 100
}
}
lock {
mode = "remote"

local {
}

remote {
}
}
recovery {
committing-retry-period = 1000
asyn-committing-retry-period = 1000
rollbacking-retry-period = 1000
timeout-retry-period = 1000
}

transaction {
undo.data.validation = true
undo.log.serialization = "jackson"
undo.log.save.days = 7
undo.log.delete.period = 86400000
undo.log.table = "undo_log"
}

metrics {
enabled = false
registry-type = "compact"
exporter-list = "prometheus"
exporter-prometheus-port = 9898
}

support {
spring {
datasource.autoproxy = false
}
}
1
2
3
4
5
6
7
8
9
10
11
12
13
14
15
16
17
18
19
20
21
22
23
24
25
26
27
28
29
30
31
32
33
34
35
36
37
38
39
40
41
42
43
44
45
46
47
48
49
50
51
52
53
54
55
56
57
58
59
60
61
62
63
64
65
66
67
68
69
70
71
72
73
74
75
76
# register.conf
registry {
# file 、nacos 、eureka、redis、zk、consul、etcd3、sofa
# 使用自己的注册中心
type = "nacos"

nacos {
# 注册中心地址
serverAddr = "192.168.0.18:8848"
namespace = ""
cluster = "default"
}
eureka {
serviceUrl = "http://localhost:8761/eureka"
application = "default"
weight = "1"
}
redis {
serverAddr = "localhost:6379"
db = "0"
}
zk {
cluster = "default"
serverAddr = "127.0.0.1:2181"
session.timeout = 6000
connect.timeout = 2000
}
consul {
cluster = "default"
serverAddr = "127.0.0.1:8500"
}
etcd3 {
cluster = "default"
serverAddr = "http://localhost:2379"
}
sofa {
serverAddr = "127.0.0.1:9603"
application = "default"
region = "DEFAULT_ZONE"
datacenter = "DefaultDataCenter"
cluster = "default"
group = "SEATA_GROUP"
addressWaitTime = "3000"
}
file {
name = "file.conf"
}
}

config {
# file、nacos 、apollo、zk、consul、etcd3
type = "file"

nacos {
serverAddr = "localhost"
namespace = ""
}
consul {
serverAddr = "127.0.0.1:8500"
}
apollo {
app.id = "seata-server"
apollo.meta = "http://192.168.1.204:8801"
}
zk {
serverAddr = "127.0.0.1:2181"
session.timeout = 6000
connect.timeout = 2000
}
etcd3 {
serverAddr = "http://localhost:2379"
}
file {
name = "file.conf"
}
}

切换默认数据源

1
2
3
4
5
6
7
8
// 排除默认状态数据源
@SpringBootApplication(exclude = DataSourceAutoConfiguration.class)
@EnableDiscoveryClient
@EnableFeignClients
public class ShopMain {
public static void main(String[] args) {
SpringApplication.run(ShopMain.class, args);
}
1
2
3
4
5
6
7
8
9
10
11
12
13
14
15
16
17
18
19
20
21
22
23
24
25
26
27
28
29
30
31
32
33
// 改为seata代理

@Configuration
public class DataSourceProxyConfig {


@Value("${mybatis.mapper-locations}")
private String mapperLocations;


@Bean
@ConfigurationProperties(prefix = "spring.datasource.druid")
public DataSource druidDataSource(){
return new DruidDataSource();
}


@Bean
public DataSourceProxy dataSourceProxy(DataSource dataSource) {
return new DataSourceProxy(dataSource);
}


@Bean
public SqlSessionFactory sqlSessionFactoryBean(DataSourceProxy dataSourceProxy) throws Exception {
SqlSessionFactoryBean sqlSessionFactoryBean = new SqlSessionFactoryBean();
sqlSessionFactoryBean.setDataSource(dataSourceProxy);
sqlSessionFactoryBean.setMapperLocations(new PathMatchingResourcePatternResolver().getResources(mapperLocations));
sqlSessionFactoryBean.setTransactionFactory(new SpringManagedTransactionFactory());
return sqlSessionFactoryBean.getObject();
}

}

在需要使用事务的方法上加

1
2
//调用发生异常时回滚。
@GlobalTransactional(name = "自定义的名字",rollbackFor = Exception.class)

先启动注册中心==》再启动seata==》再启动业务

Linux启动

1
nohup sh seata-server.sh -p 8091 -h 127.0.0.1 -m file &> seata.log &

Sentinel限流

安装

docker安装

1
docker run --name sentinel -d -p 8858:8858 -p 8791:8791 -d bladex/sentinel-dashboard:1.7.0
1
2
# 访问,默认用户名和密码是sentinel
http://localhost:8858

下载安装

sentinel下载

1
2
# 前台启动
java -Dserver.port=8080 -Dcsp.sentinel.dashboard.server=localhost:8080 -Dproject.name=sentinel-dashboard -jar sentinel-dashboard.jar
1
2
# 后台启动
nohup java -Dserver.port=8080 -Dcsp.sentinel.dashboard.server=localhost:8080 -Dproject.name=sentinel-dashboard -jar sentinel-dashboard.jar &> sentinel.log &
1
2
# 访问,默认用户名和密码是sentinel
http://localhost:8080

流控

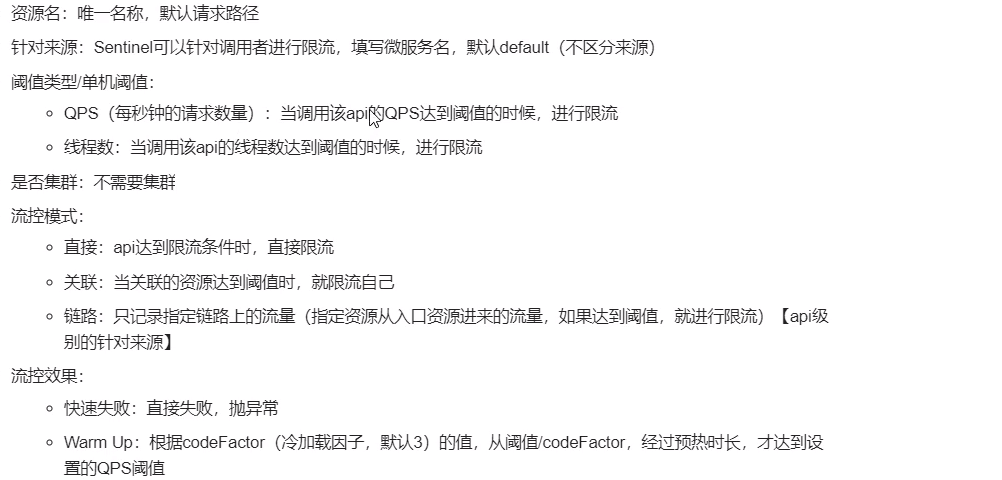
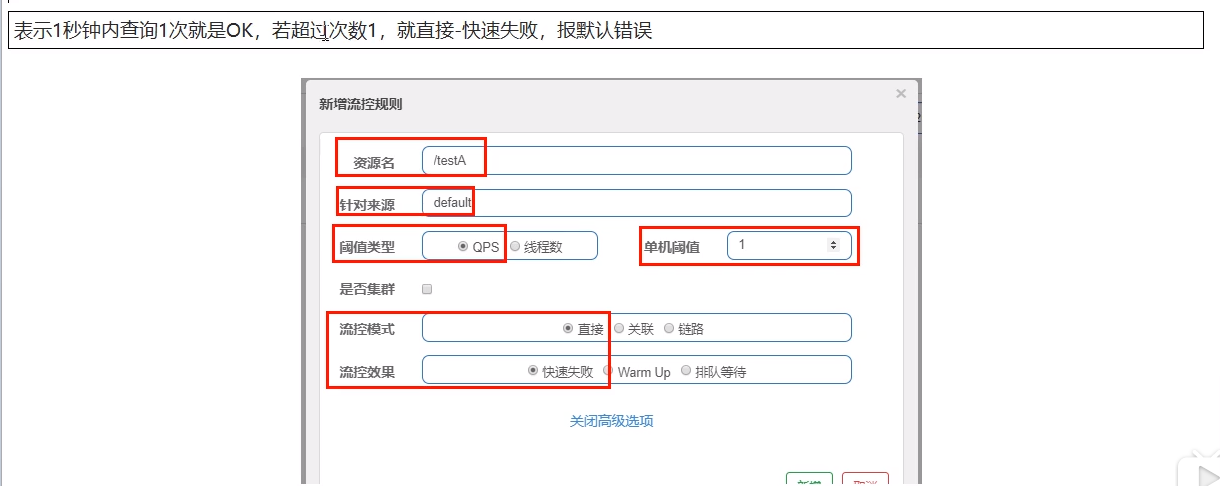
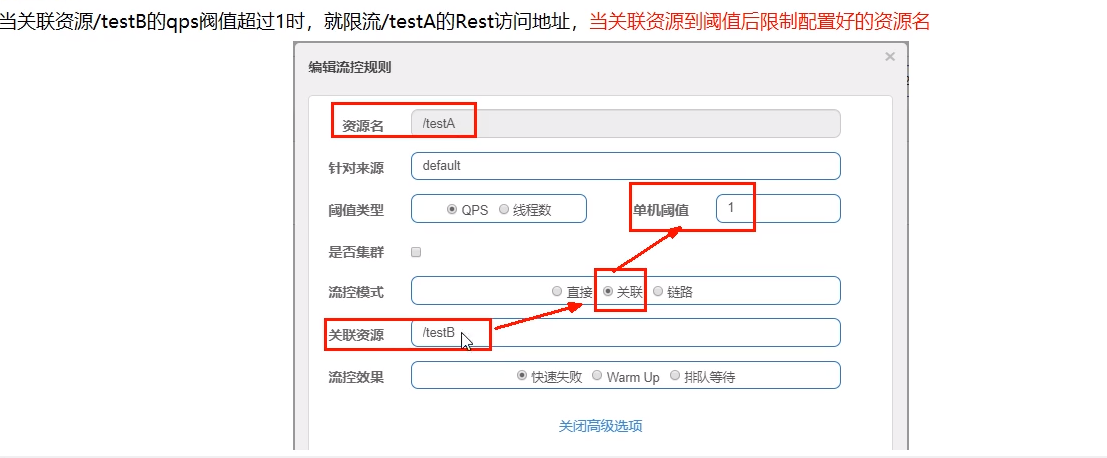
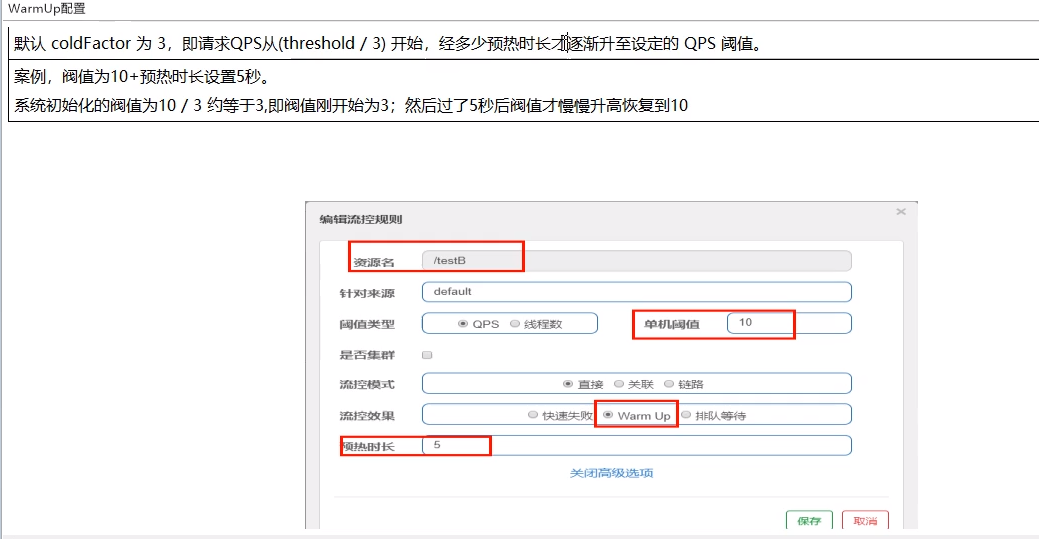
sentinel限流规则解释

sentinel限流规则1

sentinel限流规则2

sentinel限流规则3

sentinel限流规则4

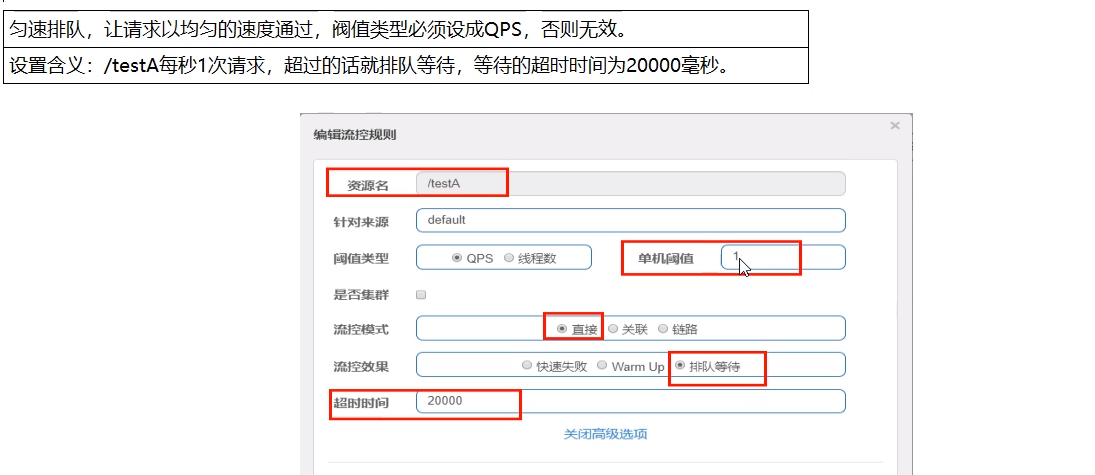
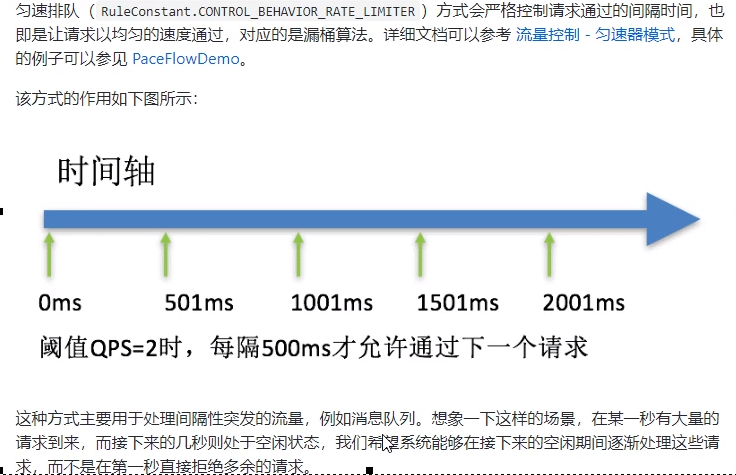
sentinel匀速排队限流

降级

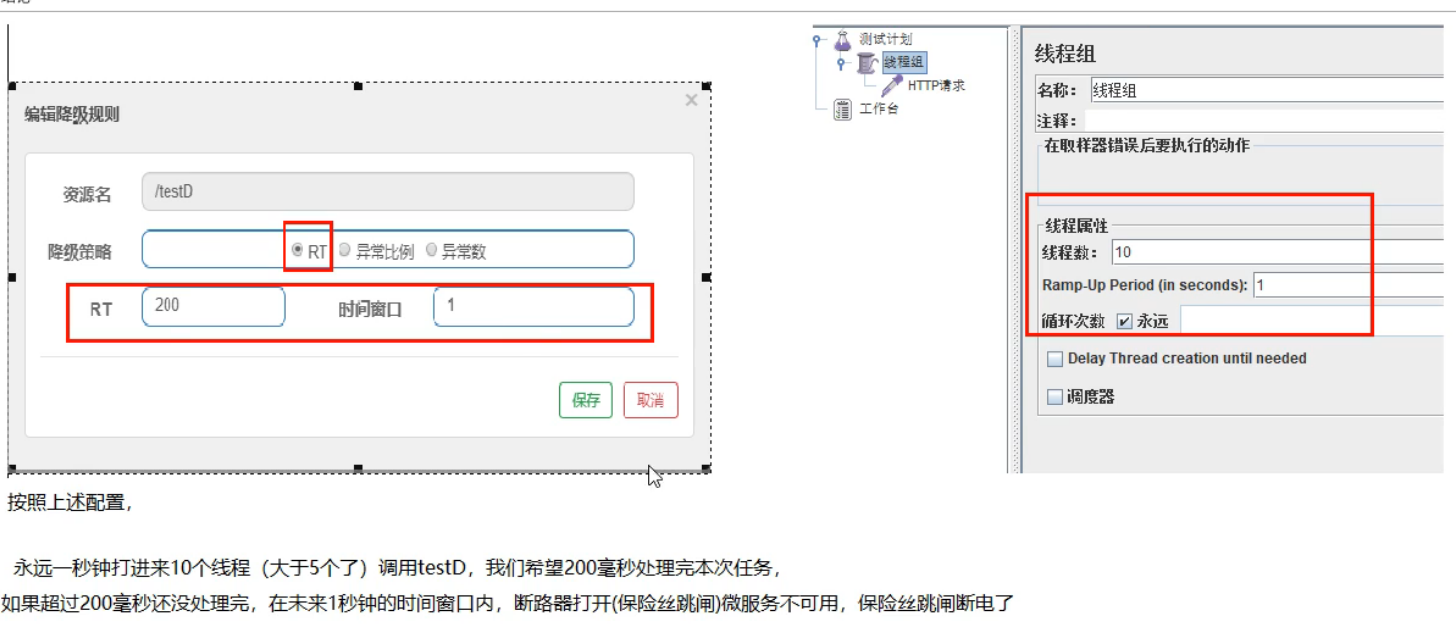
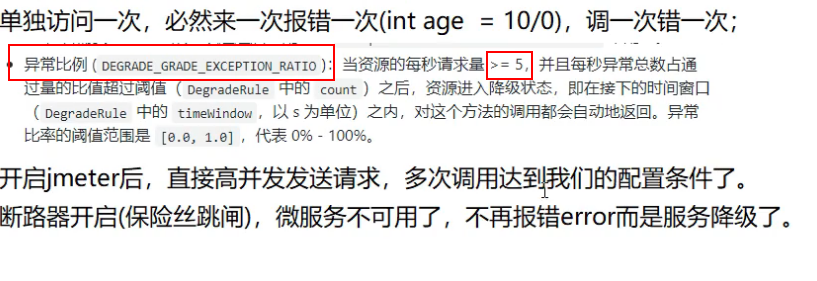
sentinel降级解释

sentinel降级1

sentinel降级2

sentinel降级3

sentinel降级4

sentinel降级5

热点key限流

sentinel热点key1

sentinel热点key2

sentinel热点key3

sentinel热点key4

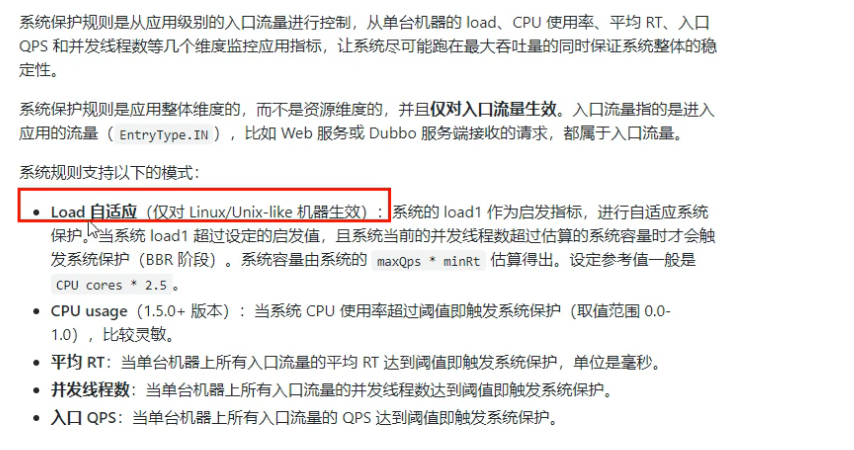
系统规则

sentinel系统规则限流

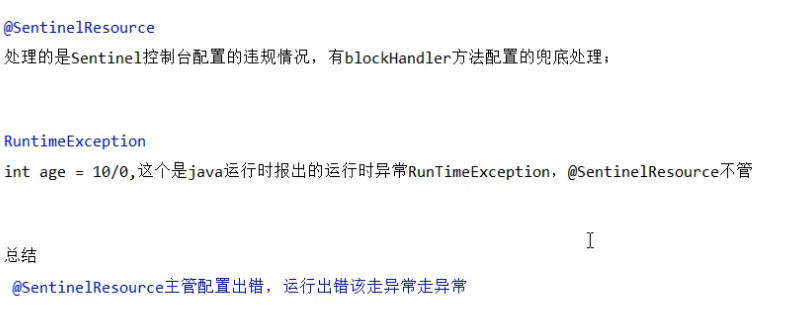
@SentinelResource

1
2
3
4
5
6
@GetMapping("/a/get")
// 设置兜底方法为MyBlockHandler类中的handException方法
@SentinelResource(value="get",blockHandlerClass=MyBlockHandler.class,blockHandler="handException")
public CommResult getInfo(){
return new CommResult(200,"成功","xxx")
}
1
2
3
4
5
6
7
public class MyBlockHandler{

// 必须是static的方法
public static CommResult handException(){
return new CommResult(444,"失败","yyy")
}
}

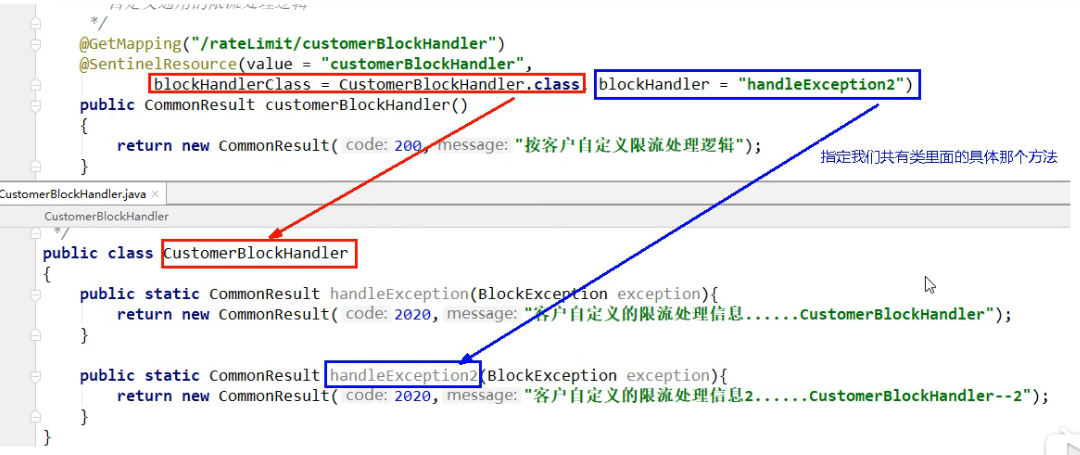
sentinel注解自定义处理限流返回信息

sentinel注解自定义处理限流返回信息2

SpringBoot使用

pom

1
2
3
4
5
6
7
8
9
<!-- 需引入SpringCloudAlibaba和SpringCloud和Springboot相关依赖 -->
<dependency>
<groupId>com.alibaba.cloud</groupId>
<artifactId>spring-cloud-starter-alibaba-sentinel</artifactId>
</dependency>
<dependency>
<groupId>org.springframework.boot</groupId>
<artifactId>spring-boot-starter-webflux</artifactId>
</dependency>

yml

1
2
3
4
5
6
7
8
9
10
11
12
13
14
15
16
17
18
19
spring:
cloud:
sentinel:
transport:
# 如果是docker启动就是8858端口,正常启动未指定端口就是8080
dashboard: 192.168.0.18:8858
# 本地用户和sentinel通信的端口
port: 8719
# 指定ip是防止多个ip时无法找到,可以不指定
client-ip: 192.168.0.11
management:
endpoints:
web:
exposure:
include: '*'
# 打开对feign的支持
feign:
sentinel:
enabled: true

规则持久化

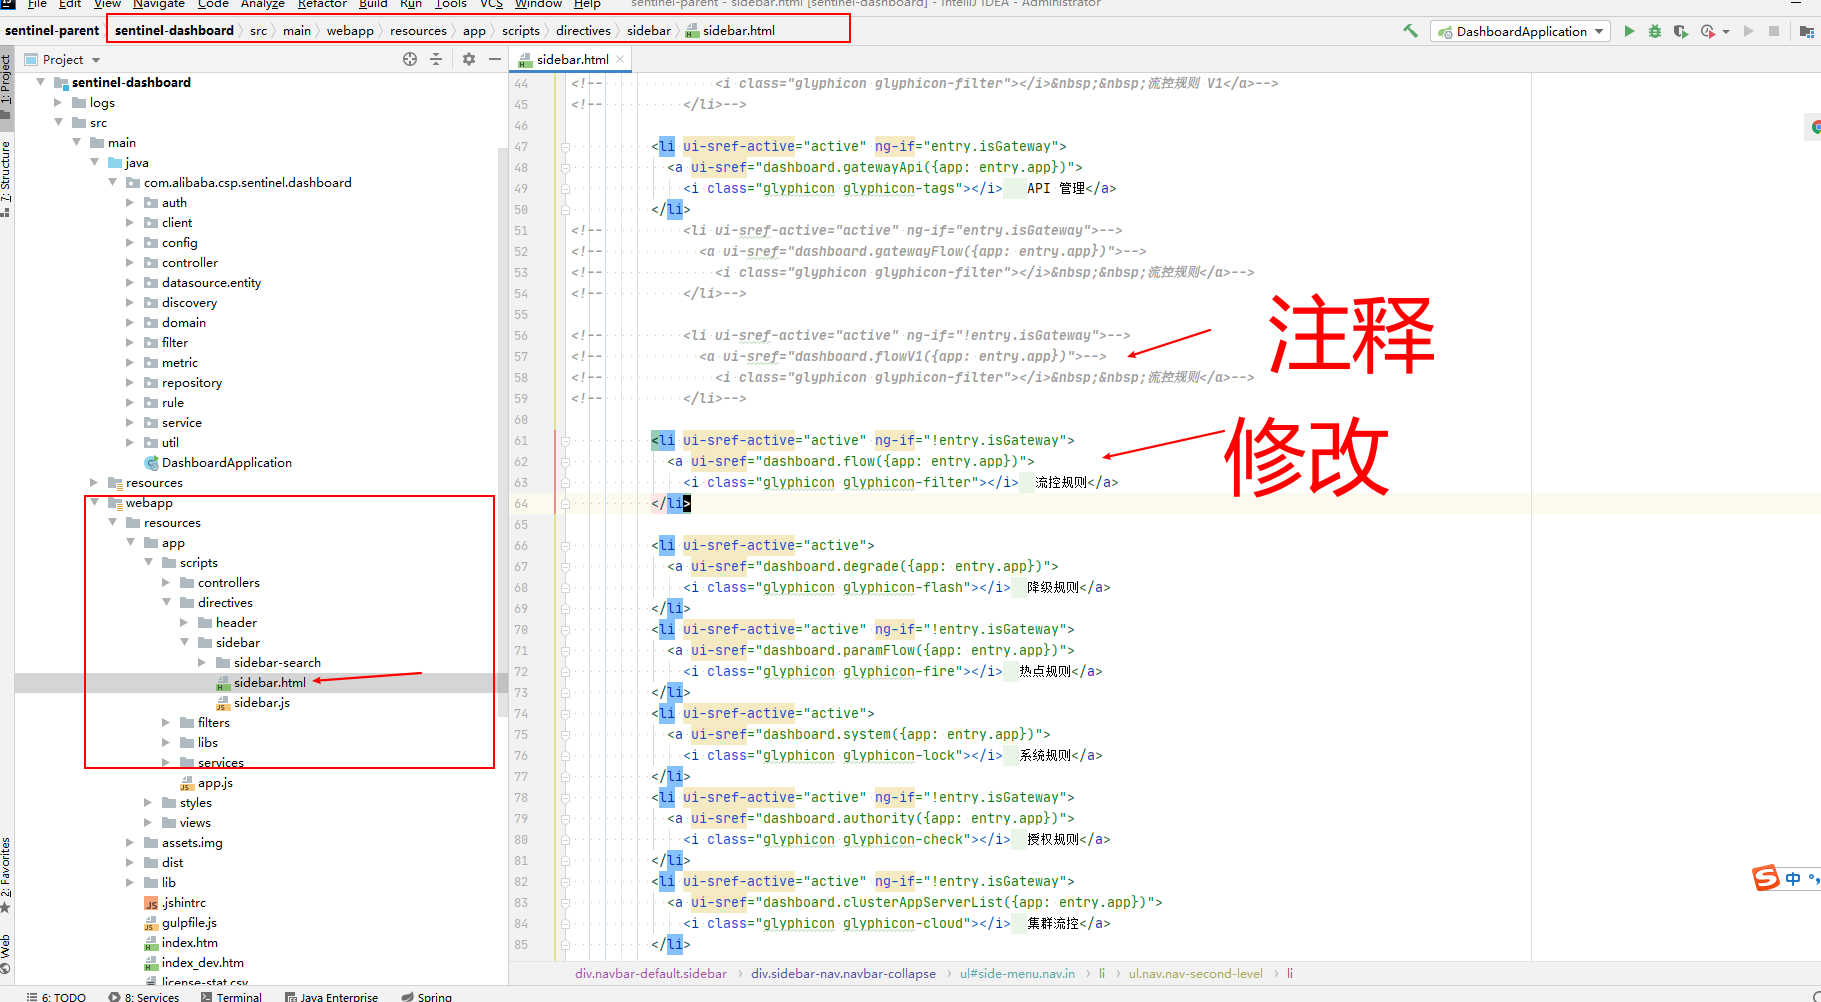
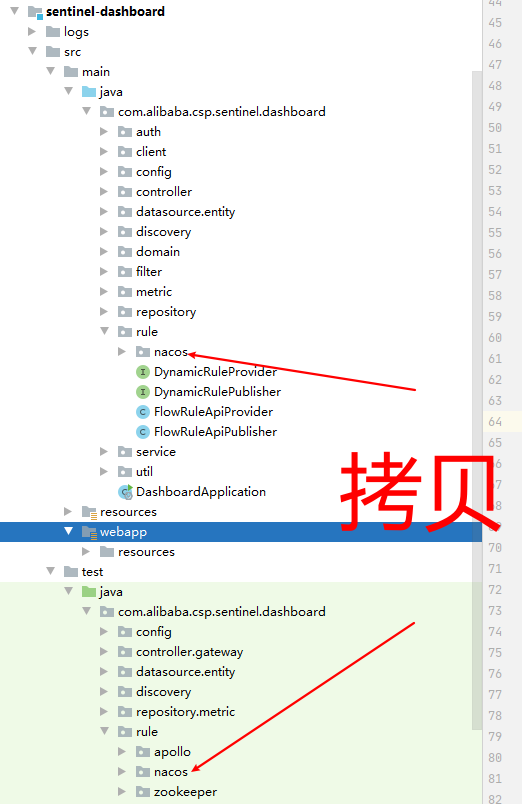
下载sentinel源码包

源码包下载

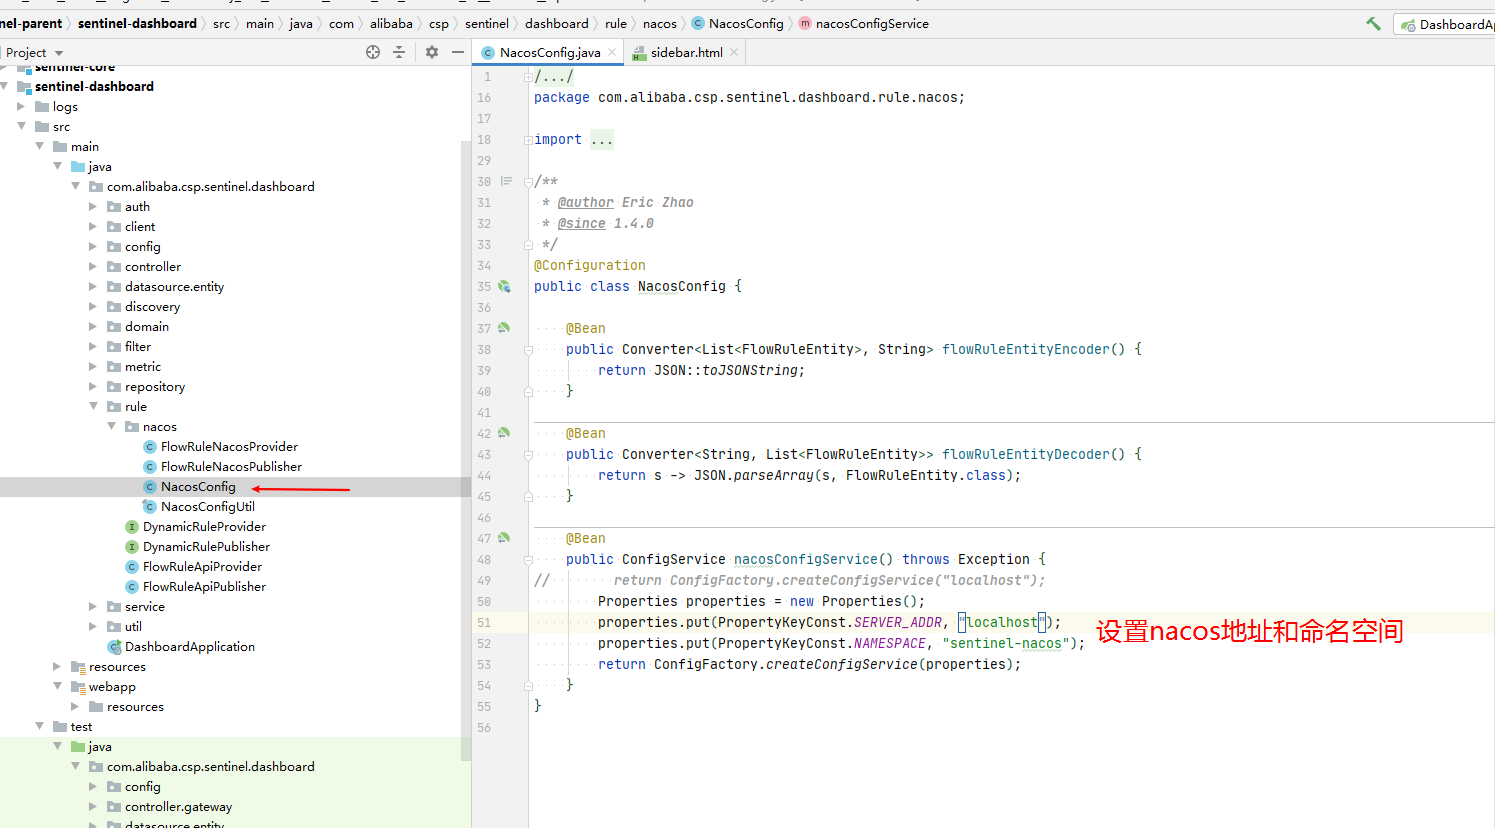
sentinel持久化1
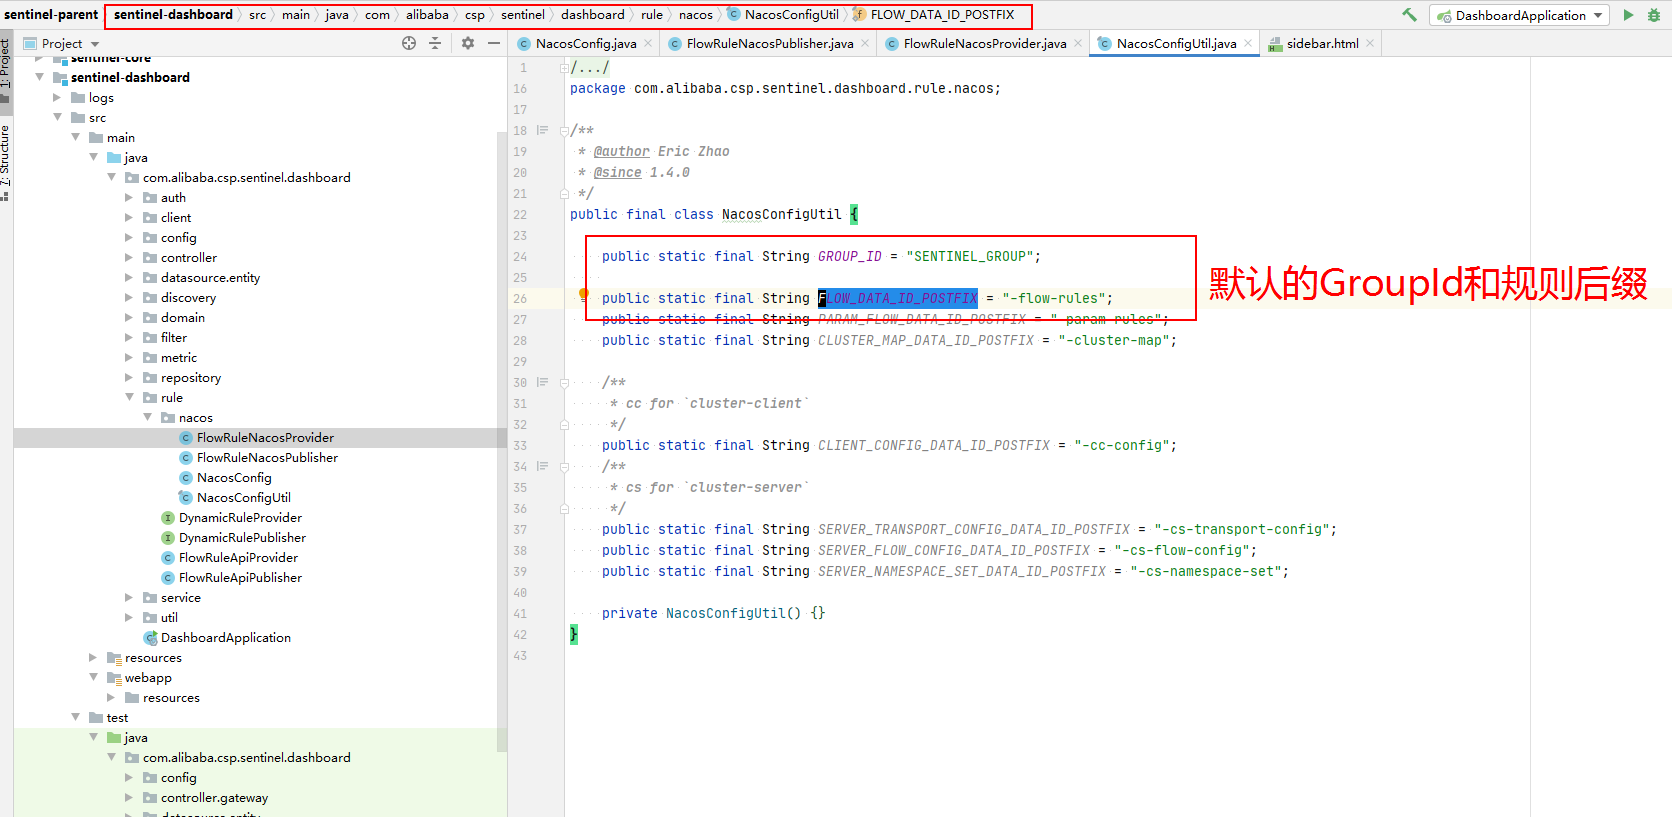
sentinel持久化2
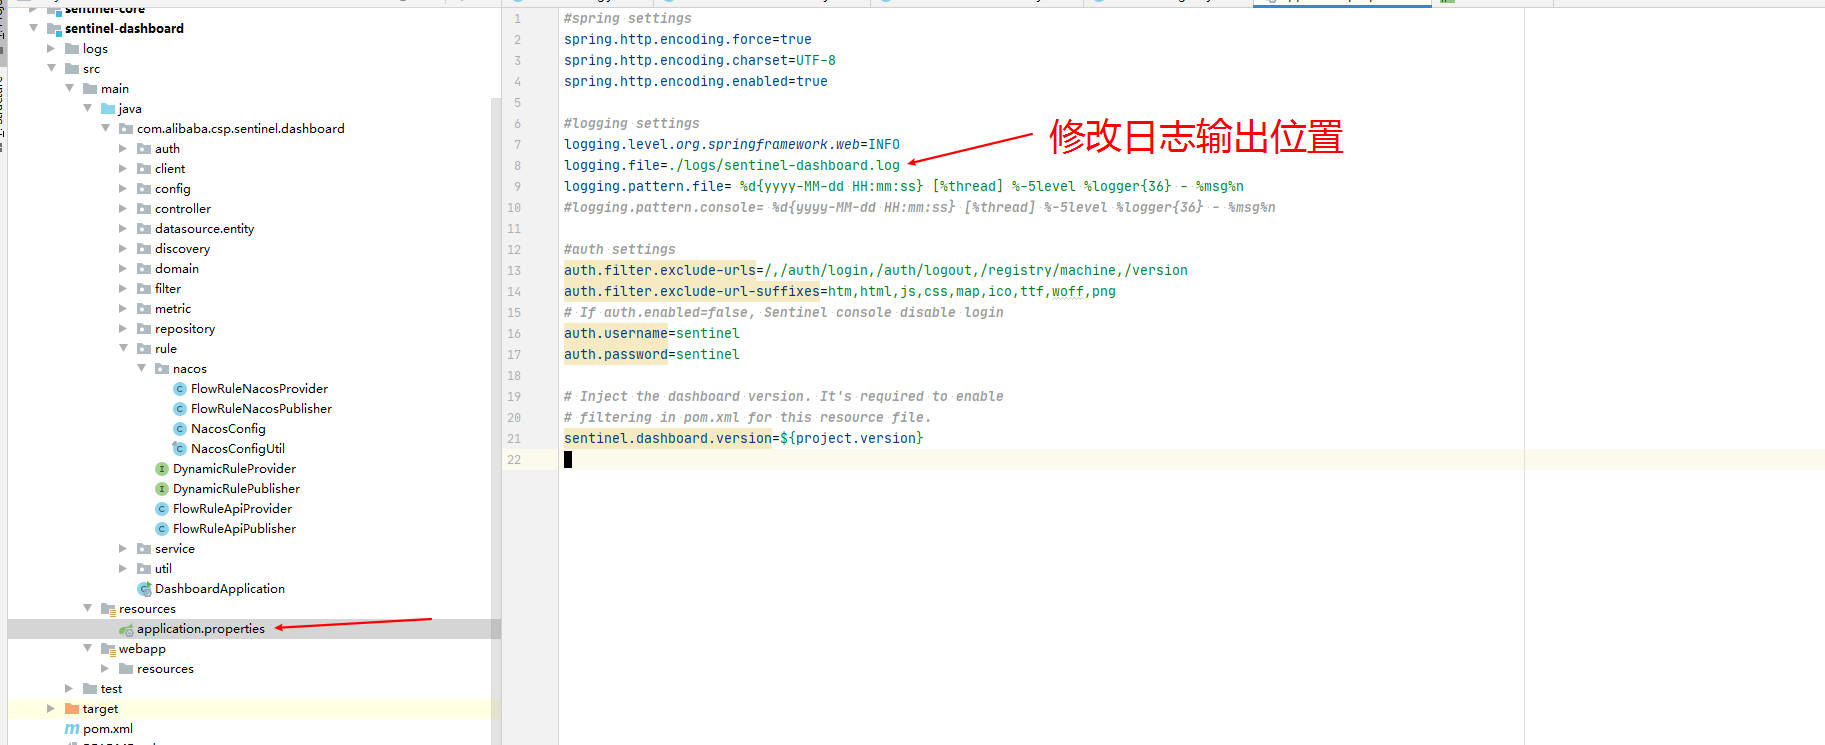
sentinel持久化3
sentinel持久化4
sentinel持久化5
sentinel持久化6

修改完成后打jar包运行

客户端使用

1
2
3
4
<dependency>
<groupId>com.alibaba.csp</groupId>
<artifactId>sentinel-datasource-nacos</artifactId>
</dependency>
1
2
3
4
5
6
7
8
9
10
11
12
13
14
15
16
17
18
19
spring:
application:
name: cloudalibaba-sentinel-service
cloud:
nacos:
discovery:
server-addr: localhost:8848 #Nacos服务注册中心地址
sentinel:
transport:
dashboard: localhost:8080 #配置Sentinel dashboard地址
port: 8719
datasource:
d1:
nacos:
server-addr: localhost:8848
dataId: ${spring.application.name}-flow-rules
namespace: sentinel-nacos
groupId: SENTINEL_GROUP
rule-type: flow

其他

熔断框架对比1
熔断框架对比2

注意

如果实时监控面板没有图表数据,但簇点链路有数据,说明是客户端的时间和服务端时间不一致

相关文章

SpringCloud

服务注册与发现

服务降级

服务调用

服务网关

服务配置和服务总线

SpringCloud-OpenFeign问题

SpringCloud-GateWay工具类

DockerCompose常用软件配置

SpringQuartz动态定时任务